Vanilla Bean Cheesecake

There’s something utterly indulgent about a slice of Vanilla Bean Cheesecake. The creamy texture mingled with the rich, aromatic notes of vanilla offers a pure delight that dances on the palate. This cheesecake stands out not just for its flavor, but for the way it invites you to savor every single bite. Imagine gathering with friends, laughter filling the air, and the centerpiece being a luscious cheesecake adorned with dollops of whipped cream. It’s the dessert of celebrations, cozy gatherings, or even just a personal treat after a long day.
Table of Contents
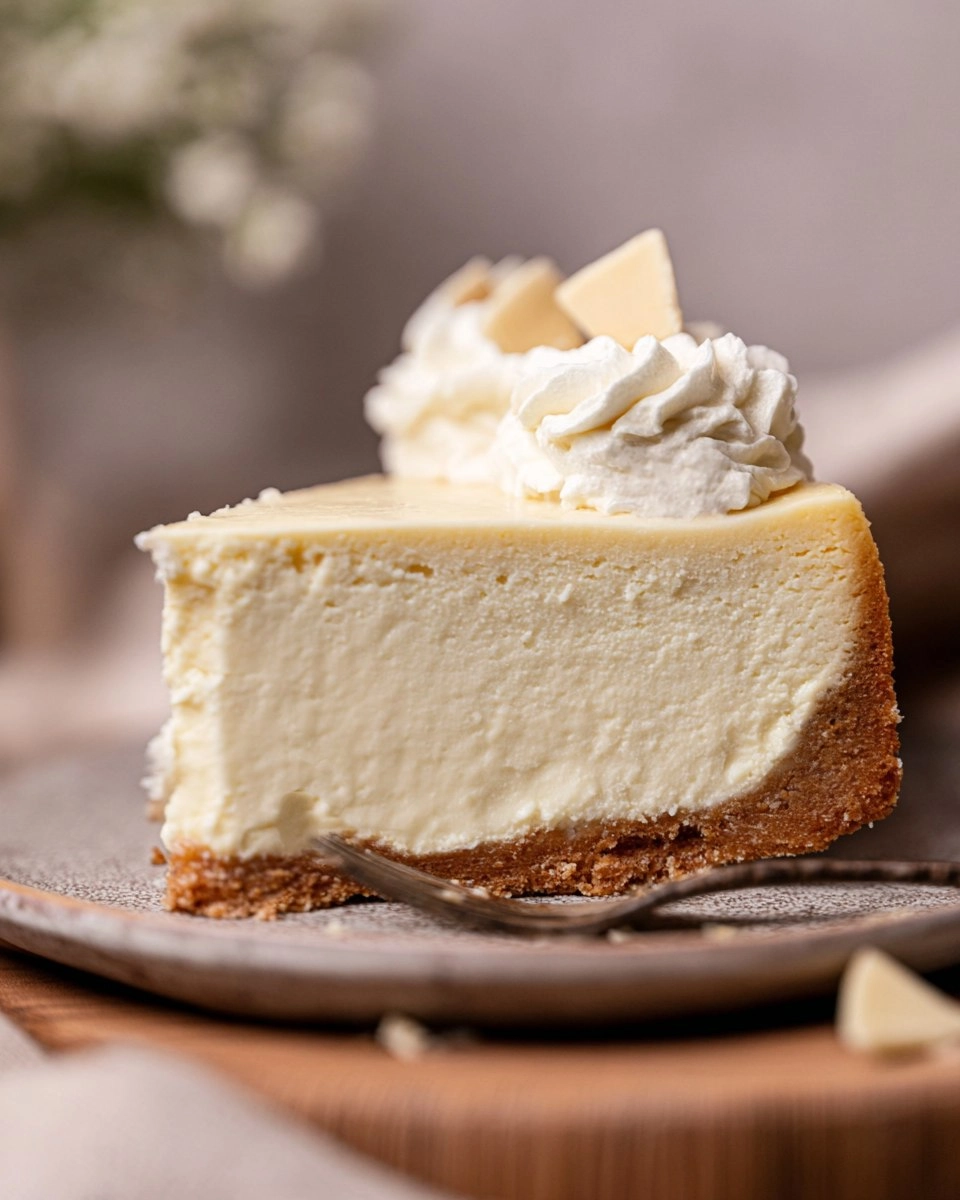
My first experience baking a Vanilla Bean Cheesecake was a revelation. It quickly became my go-to recipe whenever I wanted to impress guests or just treat myself. The beauty of this dessert lies in its simplicity—every step feels approachable, yet the end result looks and tastes truly gourmet. Trust me, once you try this homemade delight, you’ll be amazed at how it outshines any store-bought version! I invite you to grab your apron and make this extraordinary cheesecake; it’s easier than you think.
Why You’ll Love This Recipe
- Simple & Quick: With a bit of prep, you can whip up this cheesecake in no time.
- Irresistible Flavor: Rich cream cheese combined with fragrant vanilla bean paste creates an unforgettable taste.
- Eye-Catching Appeal: This cheesecake is just as stunning as it is delicious, perfect for gatherings.
- Flexible Serving: Ideal for dessert, brunch, or a sweet indulgence at any time of the day.
- Diet-Friendly Options: Consider using Greek yogurt for a lighter twist, or dairy-free alternatives if preferred.
Ingredients You’ll Need
- 11 oz Nilla Wafers: These cookies create a deliciously sweet and crunchy crust. You can swap with graham crackers if needed.
- 1/2 cup Unsalted butter, melted: This binds the crust together and adds richness; avoid using salted butter as it could alter the flavor.
- 24 oz Cream cheese, room temperature: Essential for that creamy texture. Make sure it’s soft for easier mixing.
- 3/4 cup White granulated sugar: Balances the flavors and adds sweetness; you could substitute with coconut sugar for a bit of a caramel touch.
- 1 TBSP Vanilla bean paste (or vanilla extract): For that classic vanilla flavor; the paste gives you little specks of vanilla which is visually appealing.
- 1/2 cup Sour cream: This adds a needed tanginess; Greek yogurt can be used in its place for a healthier option.
- 1/4 cup Heavy cream: Creates a rich, delightful mouthfeel. It contributes to the overall creaminess of the cheesecake.
- 4 Large eggs, room temperature: Essential for structure. Room temperature eggs blend more thoroughly and provide a smoother batter.
- 4 oz Cream cheese, room temperature: This is for the white chocolate mousse topping; soft is key for blending.
- 4 oz White chocolate bar: I recommend a high-quality brand for better flavor; you can melt this gently for the mousse.
- 2 TBSP Heavy cream: To combine with the white chocolate, enriching the mousse texture.
- 1 cup Heavy cream: Used in the whipped cream topping; make sure it’s cold for the best results.
- 1/4 cup Powdered sugar: Sweetens the whipped cream without leaving any granules; perfect for that light texture.
- 1 tsp Vanilla bean paste: For the whipped cream; complements the vanilla flavor in the cheesecake.
- 1 cup Heavy cream: Additional for whipped cream; ensures that lovely finishing touch.
How to Make Vanilla Bean Cheesecake
- Preheat the Oven: Begin by preheating your oven to 325℉. Spray a 9-inch springform pan with baking nonstick spray and line the bottom with a circle of parchment paper, then spray again for good measure.
- Prepare the Crust: In a food processor, blend the 11 oz Nilla Wafers to a fine crumb. In a small bowl, combine the crumbs with the 1/2 cup melted butter using a fork until they resemble wet sand.
- Assemble the Crust: Pour the crumb mixture into the prepared pan. Use your hands to press the crust halfway up the sides of the pan, then compact the bottom firmly with the bottom of a measuring cup.
- Bake the Crust: Place the crust in the oven and bake for 11 minutes until lightly golden.
- Prepare for the Water Bath: Start boiling water for the water bath as this will ensure a smooth cheesecake without cracks.
- Make the Cheesecake Batter: In a large mixing bowl, beat the 24 oz cream cheese with 3/4 cup sugar using a mixer on high speed for 2 minutes. Scrape down the sides of the bowl to ensure it’s well mixed.
- Add Remaining Ingredients: Mix in the 1/2 cup sour cream, 1/4 cup heavy cream, and 1 TBSP vanilla bean paste on medium speed until combined.
- Incorporate Eggs: Add the 4 large eggs one at a time on low speed, mixing just until combined; overmixing can lead to cracks in your finished cheesecake. Pour this creamy batter over the cooled crust in the springform pan.
- Create the Water Bath: Choose a method for the water bath. One option is to place the springform pan inside a 10 inch cake pan and then set this inside a roasting pan filled with hot water halfway up the sides of the cake pan. Alternatively, you can wrap the pan tightly in aluminum foil and place it directly in the roasting pan before adding hot water.
- Bake the Cheesecake: Bake for 55-65 minutes. The edges should be set while the center has a slight jiggle.
- Cool Gradually: Turn off the oven, crack the door, and let the cheesecake sit for 30 minutes. After that, transfer it to a cooling rack to cool completely in the pan.
- Chill: Once cooled, wrap the cheesecake in foil and chill in the refrigerator for at least 6 hours or preferably overnight.
- Prepare the White Chocolate Mousse: In a small bowl, beat together the 4 oz cream cheese, melted 4 oz white chocolate, and 2 TBSP heavy cream on high speed until smooth and creamy.
- Make Whipped Cream: In a metal bowl with a whisk attachment, beat the 1 cup heavy cream, 1/4 cup powdered sugar, and 1 tsp vanilla on high until thickened. Add in the white chocolate mixture and continue to beat on high until stiff peaks form.
- Serve Whipped Cream: If you’d like to make extra whipped cream dollops for decoration, simply whip another cup of heavy cream with powdered sugar and vanilla as mentioned in the previous step.
- Finish the Cheesecake: Remove the cheesecake from the springform pan and peel off the parchment circle. Evenly spread the white chocolate mousse on top.
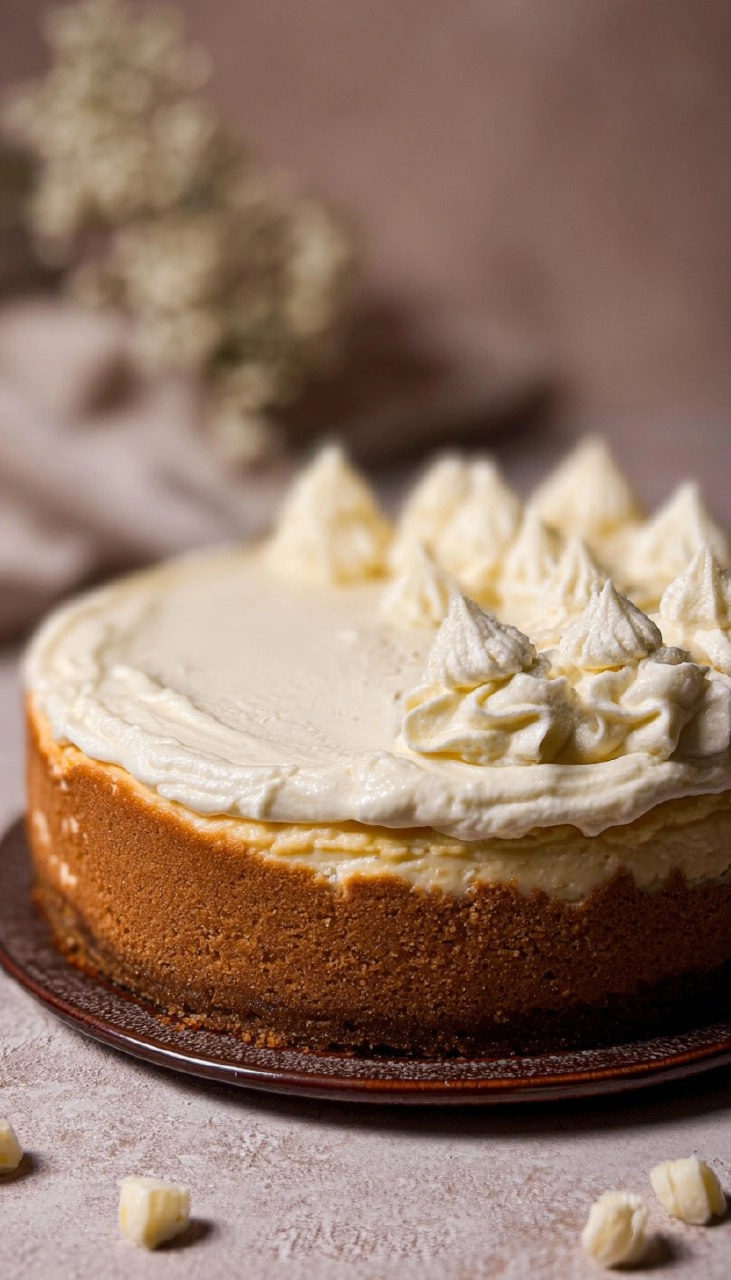
- Decorate: Using a Wilton 1M piping tip, pipe dollops of whipped cream around the edge of the cheesecake for a beautiful presentation.
Storing & Reheating
To store your Vanilla Bean Cheesecake, keep it covered in the refrigerator for up to one week. For longer storage, you can freeze it for up to three months in an airtight container. When ready to enjoy, allow it to thaw in the refrigerator overnight, and for the freshest texture, serve it cold. The flavors will remain delightful, but the creaminess might slightly change; consider refreshing with a quick whip if the texture feels a bit dense.
Chef’s Helpful Tips
- Make sure your cream cheese is at room temperature; this helps achieve a smooth batter.
- Avoid overmixing your eggs; this results in a denser cheesecake that may crack.
- When placing the pan into the water bath, make sure the water isn’t too high to prevent it from leaking.
- If your cheesecake cracks during baking, don’t fret! You can cover it with whipped cream to disguise any imperfections.
- Opt for high-quality vanilla products; their flavor makes a noticeable difference in this dessert.
- Consider making the cheesecake the day before serving; it only gets better as the flavors meld!
The rich, smooth texture of this Vanilla Bean Cheesecake combined with its stunning presentation is sure to impress. Not only is it a delightful treat but also a canvas for your creativity. Whether you opt to top it with fresh berries, chocolate shavings, or simply let it shine on its own, this cheesecake is bound to become a new favorite in your home. Enjoy the process and don’t hesitate to make it your own!
Recipe FAQs
Can I use different cookies for the crust?
Absolutely! If Nilla Wafers aren’t your favorite, graham crackers, Oreo cookies, or even ginger snaps can be excellent alternatives, lending different flavors and textures to your cheesecake crust.
How do I know when my cheesecake is done?
The cheesecake should be set around the edges while still jiggling slightly in the center when you take it out of the oven. Remember, it will continue to cook as it cools.
Can I make this cheesecake in advance?
Definitely! In fact, this cheesecake is best when made a day ahead because it allows the flavors to meld and develop, resulting in an even creamier texture.
How do I prevent my cheesecake from cracking?
To prevent cracking, make sure your ingredients, especially the cream cheese and eggs, are at room temperature. Additionally, the water bath keeps the baking environment moist and helps avoid the cheesecake surface from drying out.
PrintMore Desserts & Appetizers Recipes
Did You Enjoy Making This Recipe? Please rate this recipe with ⭐⭐⭐⭐⭐ or leave a comment.
📖 Recipe Card
Vanilla Bean Cheesecake
- Prep Time: 60 minutes
- Cook Time: 60 minutes
- Total Time: 2 hours
- Yield: 16 servings 1x
- Category: Desserts & Appetizers
- Method: Baking
- Cuisine: American
Description
This Vanilla Bean Cheesecake delights with its creamy texture and delicious flavor, featuring cream cheese, vanilla bean, and a crispy Nilla Wafer crust. Perfect for any celebration!
Ingredients
- 11 oz Nilla Wafers, 1 box
- 1/2 cup Unsalted butter, melted
- 24 oz Cream cheese, room temperature
- 3/4 cup White granulated sugar
- 1 TBSP Vanilla bean paste, or vanilla extract
- 1/2 cup Sour cream, room temperature or greek yogurt
- 1/4 cup Heavy cream, room temperature
- 4 Large eggs, room temperature
- 4 oz Cream cheese, room temperature
- 4 oz White chocolate bar, I used Lindt
- 2 TBSP Heavy cream
- 1 cup Heavy cream
- 1/4 cup Powdered sugar
- 1 tsp Vanilla bean paste
- 1 cup Heavy cream
- 1/4 cup Powdered sugar
- 1 tsp Vanilla bean paste
Instructions
- Preheat the oven to 325℉ and prepare a 9-inch springform pan with nonstick spray and parchment paper.
- Blend the Nilla Wafers in a food processor until fine crumbs form.
- In a small bowl, mix the Nilla Wafer crumbs with melted butter until combined.
- Press the mixture into the prepared springform pan, covering the bottom and halfway up the sides. Use a measuring cup to compact it.
- Bake the crust for 11 minutes.
Notes
Make sure all dairy ingredients are at room temperature for a smoother batter.
You can use Greek yogurt instead of sour cream for a healthier twist.
For more flavor, consider adding lemon zest to the filling.
Nutrition
- Serving Size: 1 slice
- Calories: 450
- Sugar: 25g
- Sodium: 300mg
- Fat: 32g
- Saturated Fat: 18g
- Unsaturated Fat: 10g
- Trans Fat: 0g
- Carbohydrates: 38g
- Fiber: 1g
- Protein: 6g
- Cholesterol: 130mg